“You employ stone, wood and concrete, and with these materials you build houses and places. That is construction. Ingenuity is at work. But suddenly you touch my heart, you do me good, I am happy and I say: This is beautiful. That is architecture. Art enters in.” – Le Corbusier
The Brief
A few years ago I had the privilege of building my own house and, being true to my love for concrete, I just had to have an off-shutter concrete fireplace in my living room. By this time I’ve done several off-shutter projects but never had to form a ‘window’ type opening in a concrete structure.
And that was exactly what the challenge with the fireplace was. How do you get the concrete to fill up to the underside of this ‘hole’ that you ‘box out’, right in the middle of the formwork?
Constructing the fireplace by doing it in two pours to first finish the bottom of the opening, would work and be quite easy to do, but I refused to accept any horizontal joints in my ‘Piece-de-Resistance’ fireplace… and patching the concrete afterwards where the second pour would join the first was just not an option. The opening had to be created in one pour, while filling the mould perfectly all around the opening. So, I set off, trying to find a solution to cast the perfect opening in an off-shutter concrete structure.
Options… Options…
After some consultations with concrete and formwork specialist, I considered the following options:
- External concrete vibration. The first problem with this option was the cost of external vibration units. They are quite a bit more expensive than a normal concrete poker and drive unit assembly and with limited application, it just could not justify spending that kind of money for only a fireplace. I could also not find one for hire, which sort of proved the point that they probably cost too much for the limited application options.
Another aspect of using external vibration that I was not happy with, was that there would be no visible way to see that the concrete-filled to the underside of the box-out formwork properly. You would have to vibrate and hope that the concrete-filled the formwork… and hope is not a plan!
- Self-Compacting Concrete (SCC). SCC was an option, but back in 2013 (when I built this fireplace), SCC was not as readily available as it is today and once again, an expensive option.
One other consideration with SCC is the high hydrostatic pressure due to the high slump flow associated with SCC, which adds considerable load to the formwork. I was going to use a brick-built kicker and not a concrete kicker, to save cost and time. So, building formwork that’s strong enough for the hydrostatic pressure, on a brick-built kicker looked like quite a risk to take.
Don’t get me wrong, there definitely is place for SCC in off-shutter concrete construction which I will cover more in future blog posts.
Working through these options, I realized I knew what I wanted and what the concrete needed. By not using SCC, it meant the concrete would have to be vibrated. I also wanted to be able to visually see that the concrete has filled to the underside of the box-out formwork. Eventually, after a lot more thinking and talking to various experts, the solution started to take shape.
The Plan
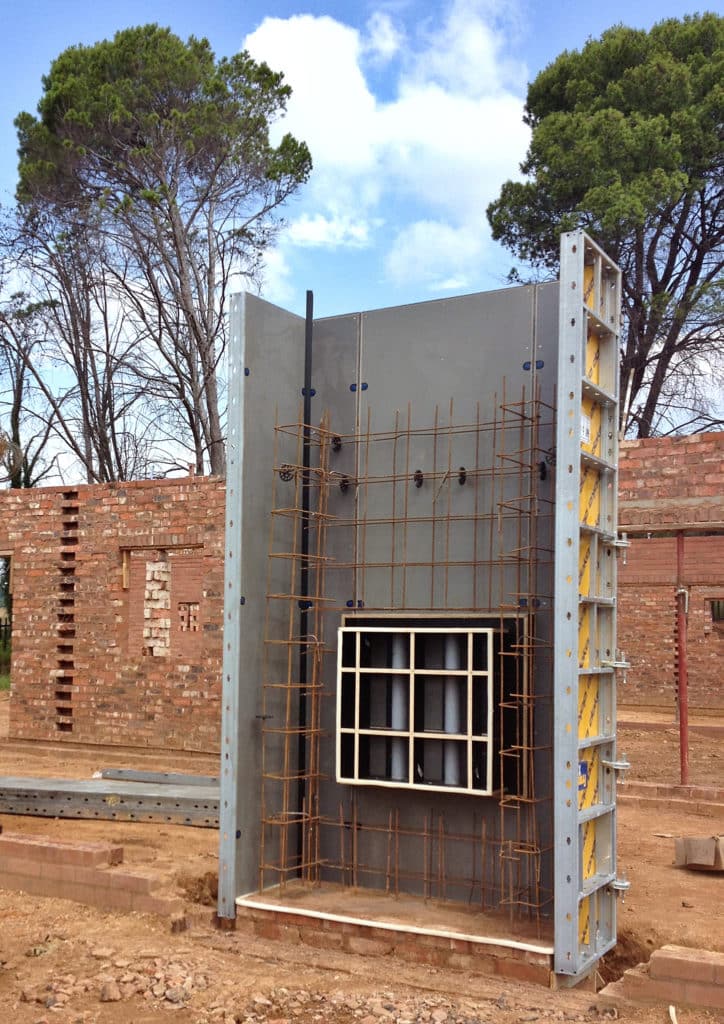
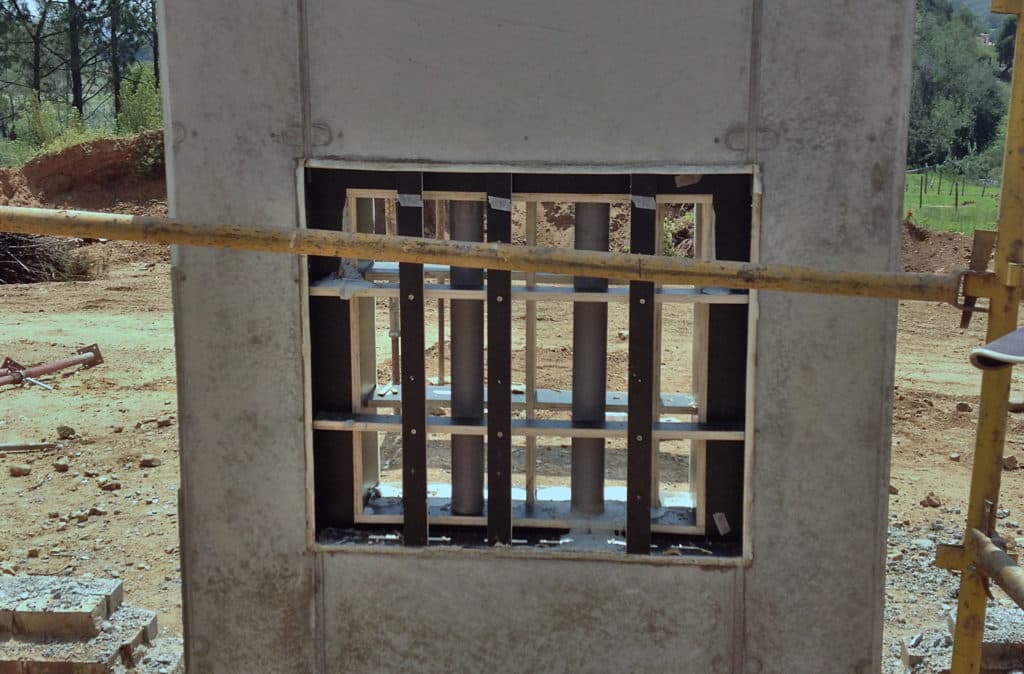
The concept started with the idea of creating openings, through the opening box-out, to drop conventional concrete pokers through, with which we could vibrate the concrete in, directly under the box-out formwork. After considering some options, the idea of putting PVC pipes through the box-out was born.
The final plan was actually quite simple… Place 75mm PVC pipes in strategic positions, through the box-out, which would allow concrete pokers to be dropped through to vibrate the concrete into the underside of the box-out. While placing and vibrating the concrete, it would be possible to see through the 75mm pipes that the concrete is filling in below the cavity under the box-out.
So, it all sounds great, but what about the concrete-filled pipes going through the opening when everything is said and done? My ‘get out of jail free’ bit, with the concrete-filled pipes in the final opening was that the pipes could be placed in an area of the opening that would be covered by the fireplace. So after cutting out the concrete-filled pipes, the marks where the pipes were, would be closed by the fireplace.
So with a carefully crafted plan, we set off building the box-out for the opening and the rest of the formwork.

Funny how, with all the focus on technical stuff, the practical often gets left behind… I still remember the frantic phone call from site to my wife as we were doing the final assembly of the formwork; ‘So dear, how high from the floor do you want your fireplace to be?’
40MPa Concrete !?
With that resolved, the final assembly was completed, ready for an early afternoon pour. I ordered a 40MPa concrete mix with a 120 slump. With the fireplace clearly not bearing any load, you would wonder why 40MPa with 120 slump concrete? There are a few reasons for this:
- A 40MPa concrete mix contains more fines so it gives a much smoother finish showing more of the formwork detail.
- Also because of the higher paste content, it ‘seals’ better in the formwork joints, making it less prone to leakage, which is one of the causes of honeycombing in concrete.
- I also like the high early strength of a 40MPa mix which make it less prone to damage when the formwork is removed.
- When doing off-shutter concrete, I always order a 120-slump mix. It costs a bit more but the additional flow that you get, helping to fill the formwork as good as possible, is fully justifiable compared to all the other costs incurred to get a good ‘off-shutter’ finish.
Ok, so enough of the technical stuff and on to the pour. The truck arrived on time, slump test was spot on, and we were ready to go. Since we were only placing 3.5m3 concrete, we placed with buckets by hand. Everything went great. The concrete-filled the sides of the mould and as we went up with the concrete level, we started vibrating through the 75mm pipes. I could clearly see how the concrete levelled out under the box-out until it filled to the underside of the box-out and into the pipes… And then disaster struck!
Disaster !
I got a frantic shout from one of my workers Patrick, next to me. ‘Eish boss, hy’s vas!’. ‘What do you mean?’ I replied. ‘Die poker boss, hy’s vas, ek kry hom niks los nie!’ (the poker is stuck, I can’t get it out!). After some inspection, I realised that a poker, going through one of the 75mm pipes, twisted below the box-out and got stuck, and no amount of pushing and pulling was getting it to come loose.
To add insult to injury, Patrick, in a state of panic, decided to turn the drive unit off, with cries of ‘NOOO!’ coming from the others as they saw this.
So, the way to get a concrete poker to vibrate is to start the drive unit and then give the poker a good shake or bump, which makes it start to vibrate. Our only hope of getting this poker out was that is would vibrate itself loose. But with the poker stuck and now turned off, that was sure not going to happen…
It’s crazy how many thoughts can go through your head in a moment of crisis… ‘All this planning and hard work, gone!’, ‘Do I break open the formwork before the concrete sets and start again?’, ‘What will my fireplace look like with a concrete poker right through the middle?’, ‘How do I explain this to my wife?!’.
Thomas to the rescue
After, what felt like forever, one of my trusted workers, Thomas said, ‘Moenie worry boss, ek maak ‘n plan!’ (don’t worry, I have a plan!).
In a moment of clarity, Thomas dropped a second poker down the side of the box-out until he could push it up against the now, dead stuck poker. (PS, always have a spare poker and drive unit at hand when placing concrete!) From there he pushed and poked and pushed and poked until he got the stuck poker started, which also made it come unstuck!
This situation had the franticness of an accident scene where a patient is receiving CPR, everyone watching, holding their breath in anticipation. And then, the relief when the patient gives a gasp of breath again!
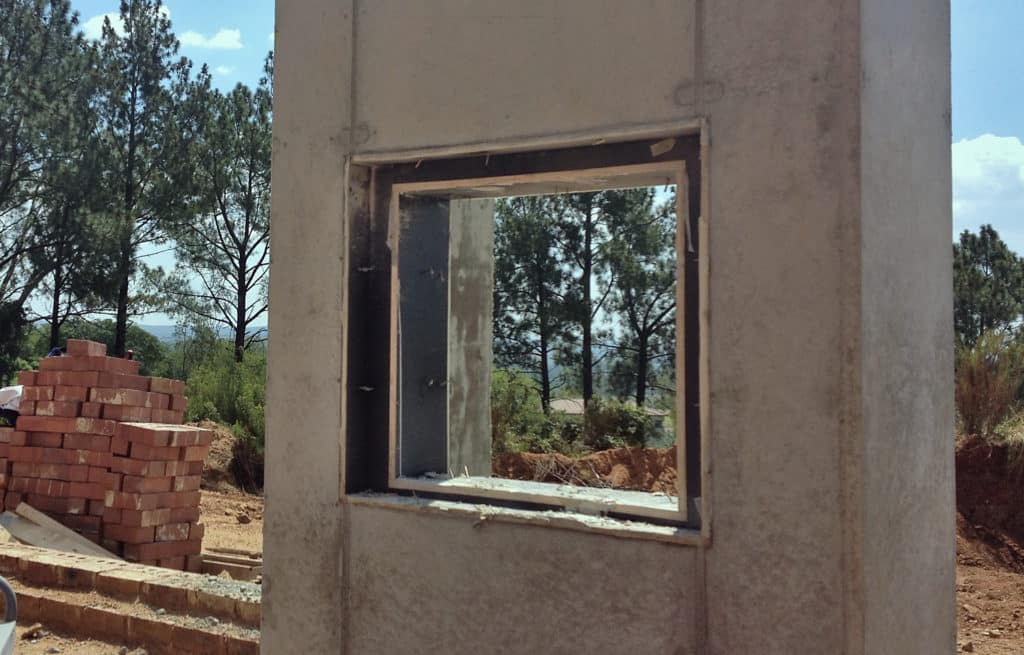
The rest of the pour went without incident. I left the formwork in place for around 36 hours and then stripped. I immediately cut the, now concrete-filled 75mm PVC pipes out using a normal masonry cutting disc. You don’t want to leave it in place to later cut through 40MPa concrete. That will be a proper waste of a diamond-tipped blade.
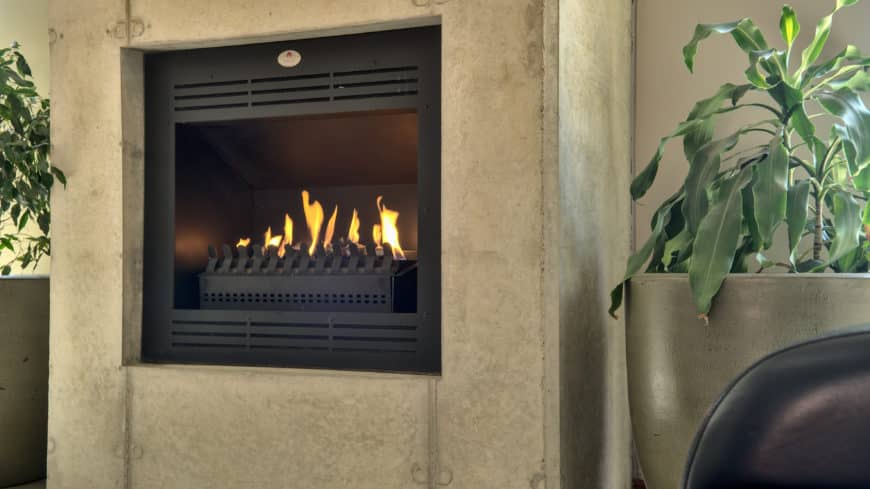
The final product
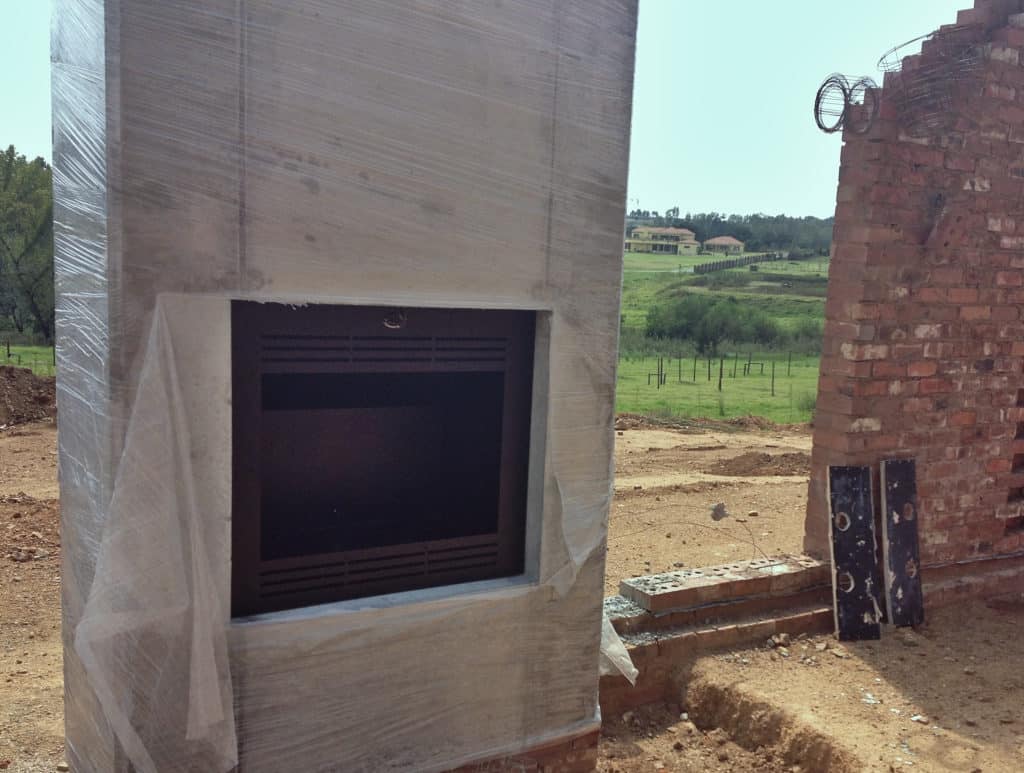
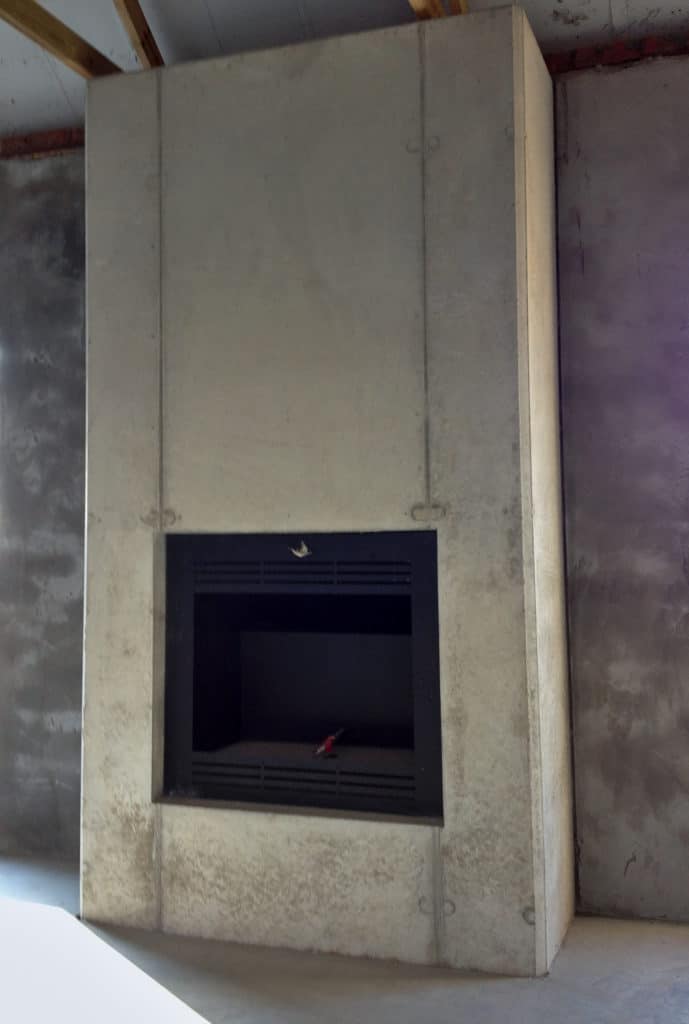
As you can see from the photos, after a lot of sweat and almost tears, I got my perfect opening! Well almost… If you look closely at the top of the opening, you will notice a slight bow where the box-out deformed under the weight of the concrete. Lesson learned; the next box was built strong enough!
The concrete was cured by wrapping it in plastic. I left the concrete wrapped for approximately three months, other than for the opening I had to cut to install the fireplace. I will cover my views on concrete curing in a separate blog, so keep a lookout for that.
That Concrete-Will
Over the years, I have learned that concrete does what concrete wants to do. It has a will of its own. But you can get to learn this ‘concrete-will’ over time, and by working with this ‘concrete-will’ and not ignoring it, by guiding it into what you want to create with it, amazing results can be achieved.
Have you had experiences with creating openings in off-shutter concrete? Do you have other ideas of how to create great-looking openings in concrete? Let me know in the comments below.
Should you require any assistance with your next concrete project or would like to get more information about our moulded concrete solutions, feel free to contact me at anton@elemento.net.za